

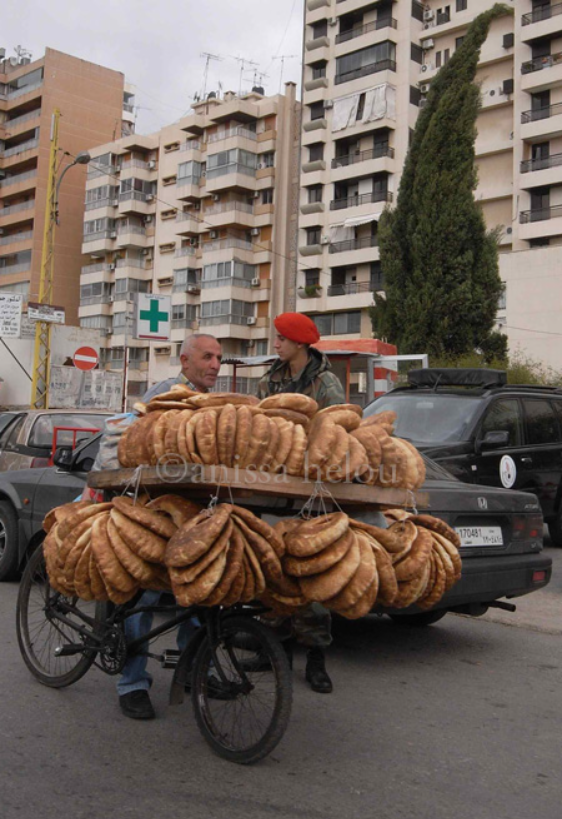
Ka’keh is the quintessential Lebanese street food. Vendors have them precariously strung on various structures which they fit on their bicycles and wheel along the corniche or regular streets. No one ever makes them at home but after I recently got into a twitter conversation with a lebanese tweep about ka’keh and how we’d both love it if we could have some here, I decided to see if I could replicate them at home.
Now, there are certain foods that are best left to specialists and in Lebanon bread and sweets are what we buy from specialist shops rather than make at home. Still, I thought it would be fun to make my own ka’keh and I decided to use an interesting recipe from my baking book for khobz al-sabah (morning bread) instead of one for pita which I would then shape into the handbag-like ka’keh.

The recipe calls for three types of flour: plain, wholewheat and cornmeal. I couldn’t find cornmeal at Waitrose, so, I used a very good polenta which I found at Leila’s, a wonderful local grocery and café. I had been to a ka’keh furn (bakery) in Byblos when writing my baking book and I saw the ka’kehs resting before baking and puffing miraculously in the oven within seconds of going in there but I never saw them being shaped nor did I get a proper recipe from the baker. Still, I reckoned I could probably make it work. So, I made my dough without too much kneading — after reading about autolyse, I developed my own version of it by kneading the dough a little, then letting it rest under the bowl for 15 minutes during which time it hydrates and becomes quite smooth and as a result needs very little kneading before shaping and proofing.

Then when the dough was ready came the big question: how to create the handbag-like shape. I decided that the best way was to roll out the dough into large circles then make an incision a third way down the circles to make the openings which I would then stretch. It didn’t quite work out. So, I cut out a little more from the top bit to arrive at the right shape, well almost right!

Thinking about it later, what I should have done was to take a round pastry cutter with which I would have cut an opening at the top of the circle of dough which I would then gently stretch to get to the handbag shape. Also, I think I rolled out the dough a little too thinly. Normally, the two layers of ka’keh are a lot thicker than regular pita. The result was not perfect but it was not an abject failure either as you can see from the picture below.

However, there is more to making successful ka’kehs than just the shaping. The morning bread dough was good enough and my oven hot enough but I really needed a baking stone for the dough to puff up immediately on contact with the heat, and I probably didn’t let the shaped ka’keh rest enough before baking. In any case, two ka’kehs was all I needed for my twitter friend and I, so, I decided to use the rest of the dough to make regular morning bread and I made a baby ka’keh with the cut-outs. The baby one was a little better but not by much. And I forgot to cover it with sesame seeds! And the friend never turned up!

Moral of the story? Worth experimenting with if you have a baking stone, a fiercely hot oven and at least two spare afternoons. You will probably need to make them twice to get a satisfactory result. The one question that I still need to have answered is how bakers get the ka’kehs to brown without crisping up too much. Do they brush them with egg yolk? I don’t know but I will try to find out and will insert a post-script when I have the answer. Until then, here is the recipe for the morning bread with the instructions to shape it into ka’keh as well as a couple of B&W pictures of the proper ka’kehs in the bakery in Byblos.
Lebanese Morning Bread
Khobz al-Sabah
I was given the recipe for this variation on pita by the same baker who gave me the recipe for mishtah (see page 000). I never asked him why he calls it morning bread but I assume it is because it is eaten mostly for breakfast. The dough is made with 3 different flours: all-purpose, wholewheat and cornmeal and as a result, the bread is more interesting than pita and has more texture. Makes 12 individual breads
3 1/3 cups (500 g) unbleached all-purpose flour, plus extra if needed
2/3 cup (100 g) wholewheat flour
2/3 cup (100 g) cornmeal
2 1/4 teaspoons (1 package) easy bake yeast
3 teaspoons fine sea salt
toasted sesame seeds
Mix the flours, yeast and salt in a large mixing bowl. Make a well in the centre. Gradually add 400 ml warm water, bringing in the flour as you go along. Knead until you have a rough ball of dough.
Remove the dough onto your lightly floured work surface. Knead for 2-3 minutes. Invert the bowl over the dough and let rest for 15 minutes. Knead for a few more minutes, or until the dough is smooth and elastic. Roll into a ball and place in a clean, lightly floured bowl. Cover with plastic wrap and let rise in a warm, draft-free place for 2 hours. Fold after the first hour. The best way to do this is to first flour your hands and work surface, then invert the bowl over your hand to let the dough drop on your palm. Gently slide it onto the work surface and pat it into a thick flat circle. From the right, fold one third over then fold the left third over then fold the top third over and the bottom over it. Return to the bowl with the folded side down. Folding the dough will strengthen strengthen and make it rise better.
When it is ready, remove the dough onto your work surface. Divide in 6 equal pieces. Roll each into a ball. Place on a lightly floured tray. Cover with a wet, although not dripping kitchen towel and return to rise for 45 minutes.
Roll out each ball of dough to a disk about 25 cm diameter, then either make the opening as I explained above or use a 7.5 cm round pastry cutter and cut an opening at the top of your dough then gently stretch the opening to create a handbag-like shape. Transfer onto a non-stick baking sheet (or one lined with parchment paper or a rubber baking mat) where you will have spread an even layer of sesame seeds. Cover with a floured couche (baker’s linen). Let rest for about 15 minutes.
Preheat the oven to 500 degrees or to its highest setting.
Brush your ka’kehs with water. Sprinkle sesame seeds to cover and bake in the preheated oven for 6-8 minutes, or until puffed up and very lightly golden. The baking time may vary, depending on how hot your oven is. As with pita bread, I suggest you check the breads after 5 minutes. Again, these are best served immediately or still warm. Alternately, you can let them cool on a wire rack and freeze them for later use.

I should have looked at my pictures before embarking on the experiment as I am pretty sure the opening is made with some sort of round pastry cutter. Next time, after I get myself a baking stone. In the following picture, you can see how the ka’kehs puff out almost as soon as they hit the baker’s oven floor!


